App Framework migration guide
#Overview
This document covers the migration process from UIX to app. In order to follow this guide, you need to have access to our App Framework.
You need to complete all three steps to successfully migrate from UI Extensions to the App framework.
At the end of the document, we also offer an example you can follow.
#1. Declare your app for migration
Follow these steps to declare your app for migration:
- Access our App registration page, and fill in the form details:
- Write a
Nameand, optionally, aDescriptionfor your app. Then, add anAvatar URL. This is is the logo that will display next to your app's name.Name,Description, andAvatar URLare later on shown to users in the installation URL. API IDdecides the final installation URL for your app. For instance, the installation URL could be something likehttps://app.hygraph.com/apps/my-app/new.Setup URLis where the app is configured or installed. For an app you'll need a setup page whereupdateInstallationSDK method has to be called, and a page where the Element (UIX) is deployed. This document section provides additional information on how to create yourSetup Pagebut, essentially, in yourSetup URL, you can show users a custom installation form for them to enter theAPI_KEYand then callupdateInstallation(accessed viauseApphook).- For the purpose of this document, consider
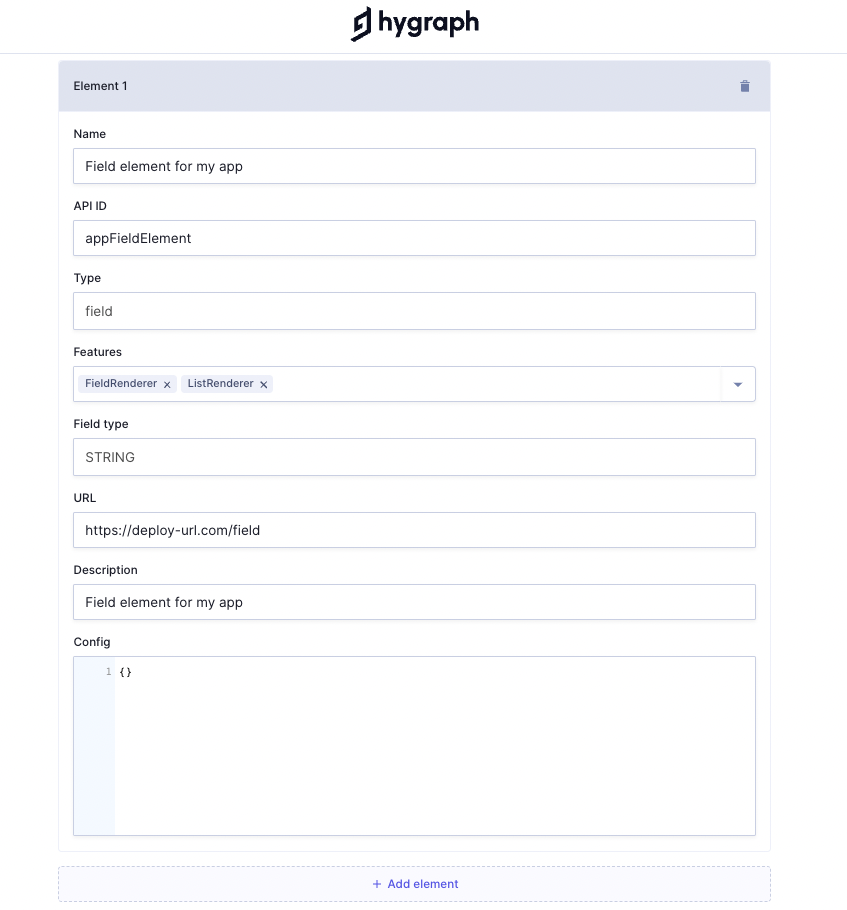
Elementsto be a synonymous of UIX. This document contains detailed information on how to use theElementsform. For migrations, please consider the following:Description&Name: This information is rendered in theFieldcard in the Schema Editor.Type: If you're migrating from aField UIX, selectFieldas Element type. If you're migrating from aSidebar UIX, then useformSidebarinstead.Features: Element features indicate where the App Element should be used instead of native Hygraph Renderers.URL: Element URL is what we render in theiframe.Config: This is the same asdelcaration fieldConfig, and it's used to set up instance config.
 Declare your app for migration
You can add multiple UIX/App Elements under the same app, so as soon as the app is installed, users will be able to use all of the elements.
The Elements section of the form is explained in detail in this document.
#2. Create a Setup Page
The next step is to make a Setup Page and update your UIX code:
- Replace
@graphcms/uix-react-sdkwith package@hygraph/app-sdk-react(if you're using vanilla JS SDK@graphcms/uix-sdkthen replace it with@hygraph/app-sdk), and update theimportaccordingly. - Remove
declarationfromWrapper.
#Field UIX
If you used a Field UIX code, like the one shown in our examples section, the final code for your app should look similar to this:
// Setup pageimport { useApp, Wrapper } from '@hygraph/app-sdk-react';const SetupForm = () => {const { installation, updateInstallation } = useApp();return (<formonSubmit={(e) => {e.preventDefault();updateInstallation({config: {API_KEY: e.currentTarget.elements.API_KEY.value,},status: 'COMPLETED',});}}><input type="text" name="API_KEY" /><input type="submit" value={'Install App'} /></form>);};const SetupPage = () => {return (<Wrapper><SetupForm /></Wrapper>);};
// Fieldimport { Wrapper, useFieldExtension } from '@hygraph/app-sdk-react';function MyField() {const { value, onChange, installation } = useFieldExtension();console.log(installation.config);return <input value={value} onChange={(e) => onChange(e.target.value)} />;}export default function MyCustomInputExtensionPage() {return (// no declaration<Wrapper><MyField /></Wrapper>);}
#Sidebar UIX
If you used a Sidebar UIX code, like the one shown in our examples section, the final code for your app should look similar to this:
// Setup pageimport { useApp, Wrapper } from '@hygraph/app-sdk-react';const SetupForm = () => {const { installation, updateInstallation } = useApp();return (<formonSubmit={(e) => {e.preventDefault();updateInstallation({config: {API_KEY: e.currentTarget.elements.API_KEY.value,},status: 'COMPLETED',});}}><input type="text" name="API_KEY" /><input type="submit" value={'Install App'} /></form>);};const SetupPage = () => {return (<Wrapper><SetupForm /></Wrapper>);};
// Sidebarimport { useFormSidebarExtension, Wrapper } from '@hygraph/app-sdk-react';function SidebarElement() {const { extension } = useFormSidebarExtension();return (<div><h3>Sidebar Example</h3><button onClick={() => alert('Hello, Hygraph!')}>Click Me</button></div>);}export default function Sidebar() {return (<Wrapper><SidebarElement /></Wrapper>);}
#3. Update fields to use the new App Elements
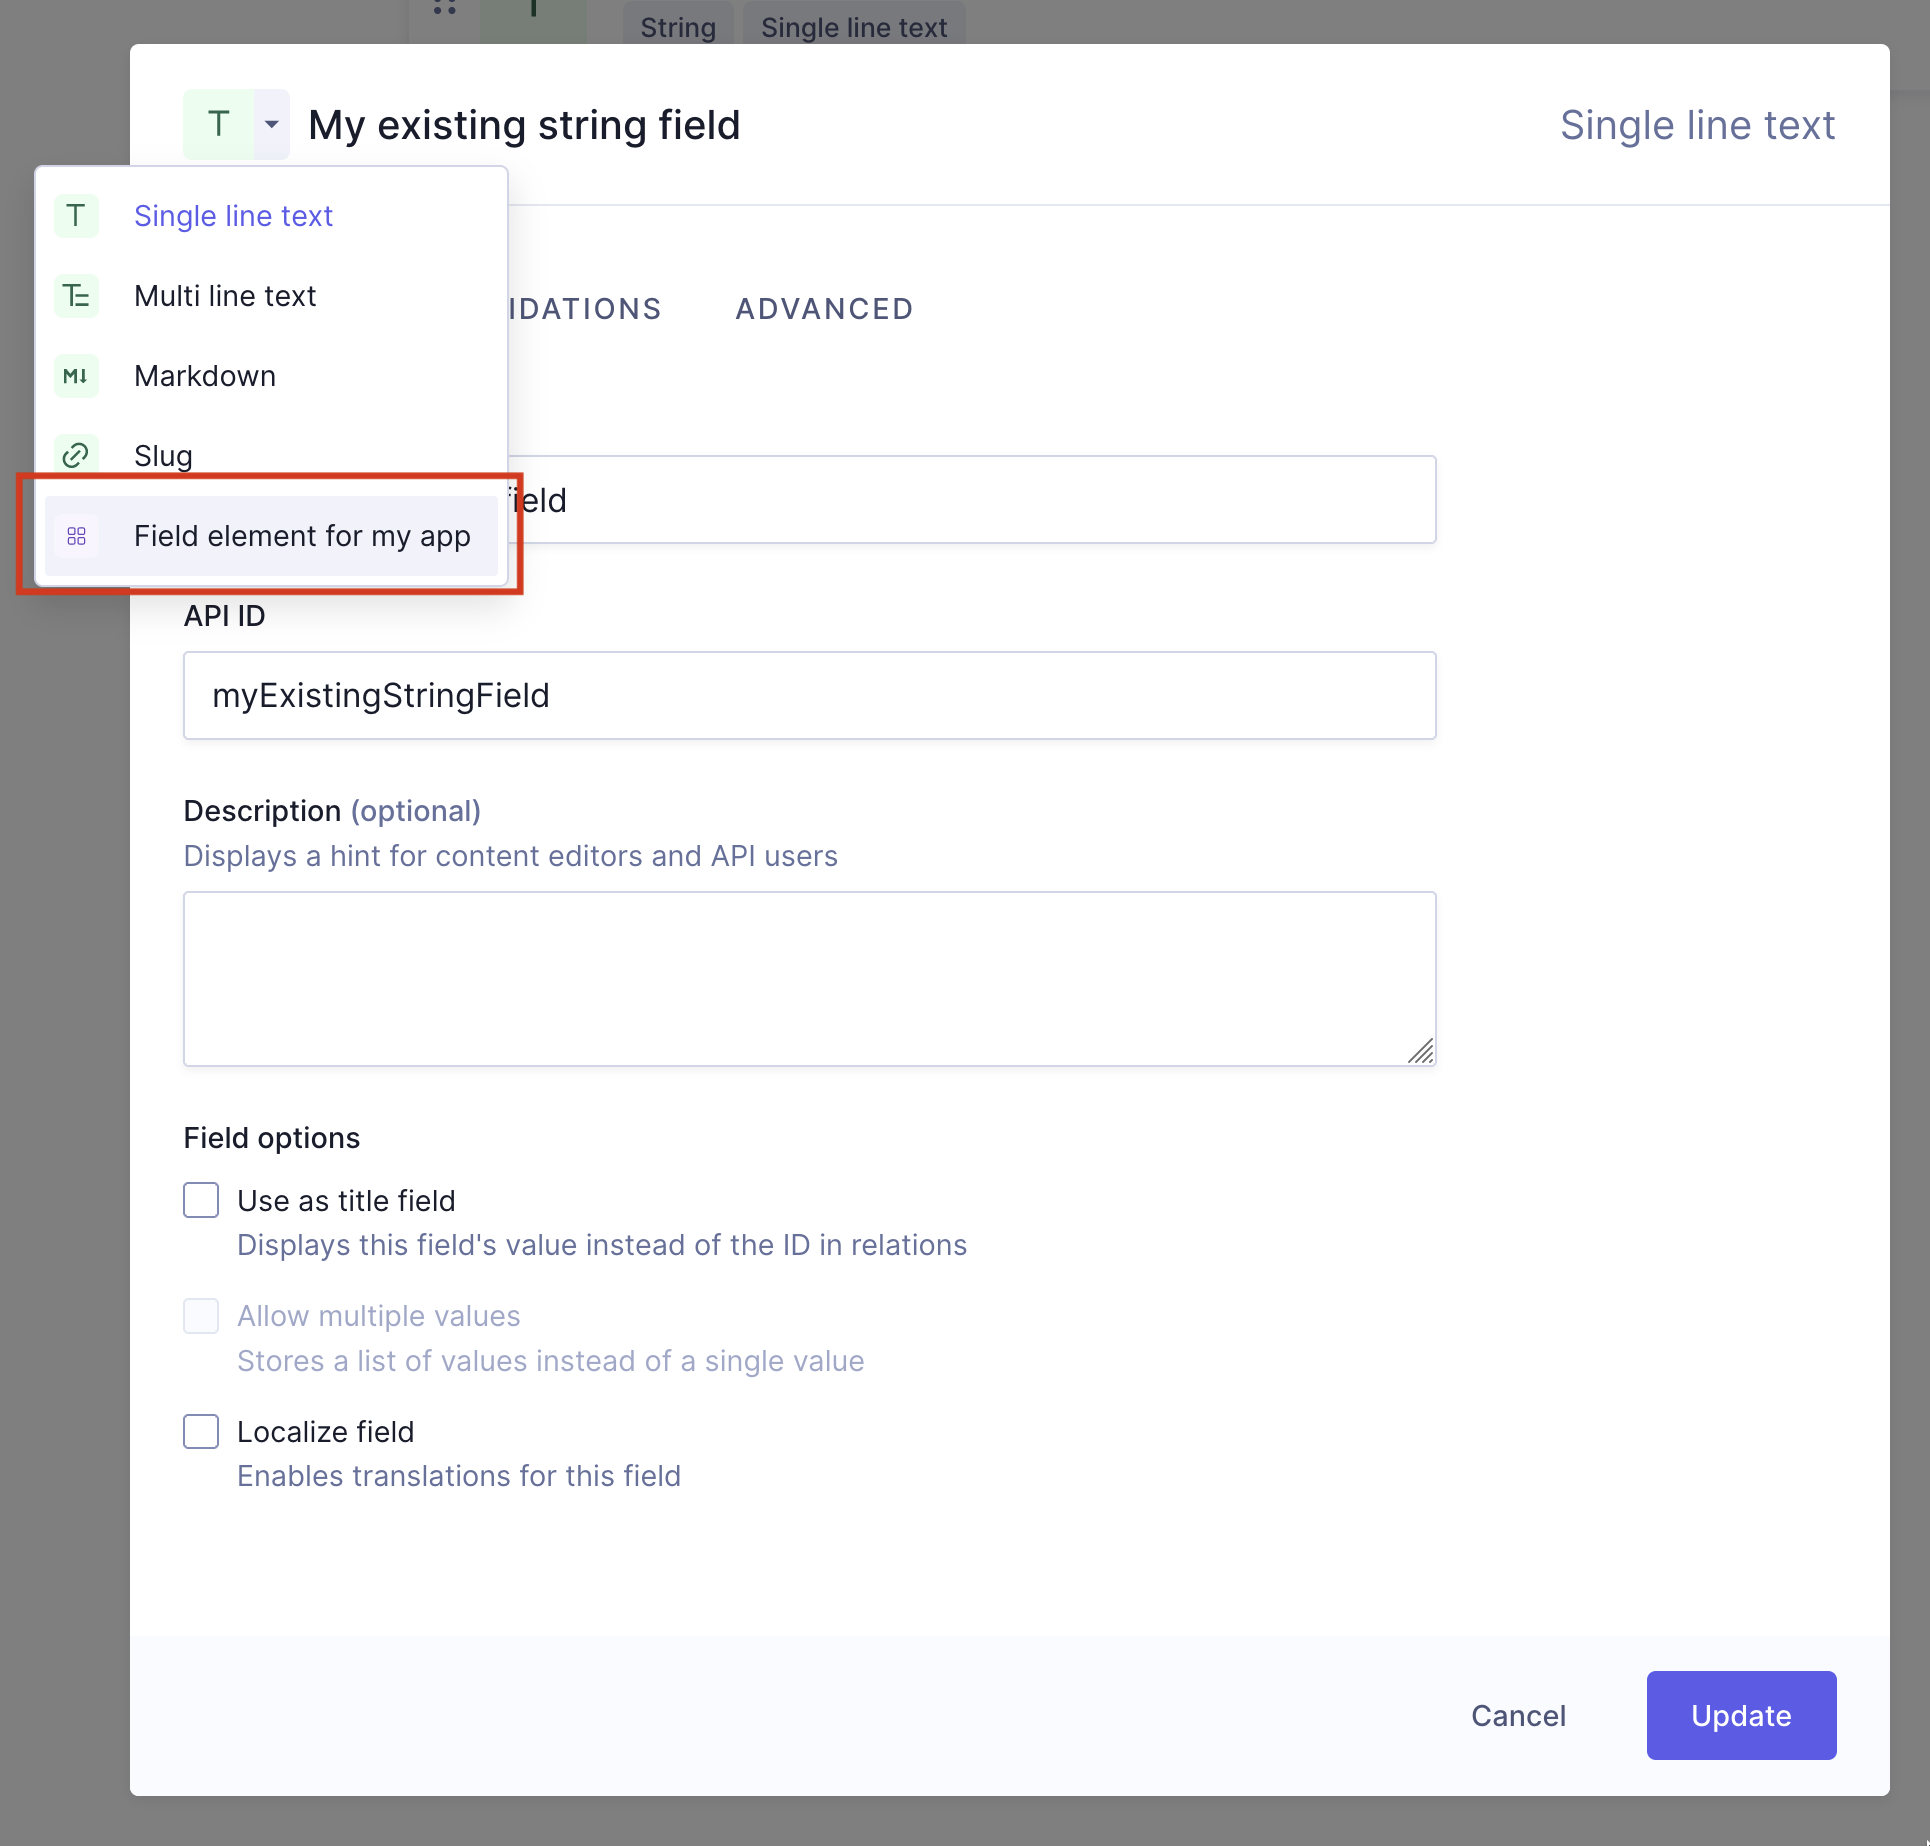
Once a user has installed the app - updateInstallation is called with status COMPLETED - they can Navigate to the Schema editor, and update their fields, previously used by UIX, to use the new App Element by selecting it from the dropdown as shown in the example below:
 Update fields to use the new App Elements
#Step by step example
Imagine you have the following Field UIX:
import { Wrapper, useFieldExtension } from '@graphcms/uix-react-sdk';function MyField() {const { value, onChange } = useFieldExtension();return <input value={value} onChange={(e) => onChange(e.target.value)} />;}const declaration = {extensionType: 'field',fieldType: 'STRING',name: 'My custom field',features: ['FieldRenderer', 'ListRenderer'],config: {API_KEY: {type: 'string',displayName: 'API Key',},},};export default function MyCustomInputExtensionPage() {return (<Wrapper declaration={declaration}><MyField /></Wrapper>);}
Or the following Sidebar UIX:
import { Wrapper, useFormSidebarExtension } from '@graphcms/uix-react-sdk';const SidebarElement = () => {const { extension } = useFormSidebarExtension();return (<div><h3>Sidebar Example</h3><div><button onClick={() => alert('Hello, Hygraph!')}>Click Me!</button></div></div>);};const declaration = {extensionType: 'formSidebar',name: 'Sidebar name',description: 'Sidebar description',};const SidebarExample = () => {return (<Wrapper declaration={declaration}><SidebarElement /></Wrapper>);};export default SidebarExample;
With UIX you can deploy it on any platform - e.g. Vercel, Netlify, Render, etc. - and share the URL with people who'd like to use the extension.
In this case, people could then go to project > project settings > UI Extensions and add your UIX to their project, which can then be used in place of native Hygraph native renderer.
For an app the process is different. As we mentioned before, you'll need a setup page where updateInstallation SDK method has to be called, and a page where the Element (UIX) is deployed.
To migrate this example from UIX to app follow these steps:
- Declare your app for migration as explained in detail here.
- If users tried to install the UIX shown in the example above, they'd be able to add
API_KEYfrom Hygraph's UI, but for apps this is done by the app developer. In this step, you will create a setup page, as shown here. In your setup page, you can render a form for users to enterAPI_KEYand then callupdateInstallation({status: "COMPLETED", config:{ API_KEY: "API Key input value" }})(accessed viauseApphook).configprovided toupdateInstallationhook is just like global config for UIX and can be accessed in Field App Element. - Once
updateInstallationis called with statusCOMPLETED, you can navigate to the Schema editor and update your fields to use the new App Elements, as shown here.
#Resources
- App Framework: Overview to our App Framework, which extends Hygraph capabilities, offering the possibility of creating your own custom apps and sharing them with other users.
- Register an app: Documentation for developers on how to register an app on the Hygraph platform.
- Using app tokens: Document on how to generate an app token for your app during installation.
- Install an app: Step by step guide on how to install an app in your Hygraph project.
- Delete an app: Documentation for developers on how to delete an app you have created.
- First steps: Comprehensive step-by-step guide on how to develop an app with custom field and sidebar elements.
- Next.js starter: Document that guides you through the process of developing an app with a custom field using our
Next.jsstarter. - API Reference: Our App Framework API Reference.